Introduction
Picture a February morning in Georgina. The thermostat says 21°C, the furnace is humming, yet the wall by the couch feels icy, and a faint draft brushes past your ankles. The room never feels hot, no matter how high the heat is set. The hydro bill continues to climb, and it is difficult to explain why.
That scene is a classic example of thermal bridges and micro air leaks at work. These are the invisible paths where heat slips out of a house and cold sneaks in, even when the walls look “well insulated.” In many Canadian homes, thermal bridges and tiny gaps can cause 15–30% of all heat loss. They create cold spots, stubborn drafts, and those walls in the house that never seem to warm up.
This guide walks through what thermal bridges are, where they hide, and how to deal with them in a real Ontario home. It covers simple home air sealing tips, rim joist insulation ideas, and long‑term upgrades like better windows and exterior insulation. Along the way, it shows how JFB Painting and Handyman Services helps Georgina homeowners track down and fix these weak spots. Read to the end and you will have a clear plan to get closer to steady comfort, lower bills, and fewer winter headaches.
 |
| Different layers that protect your walls from heat lost |
The Lake Simcoe Wind Factor
Living in Georgina, Keswick, or Pefferlaw means we don’t just deal with the cold; we deal with the wind off the lake. In the winter, our average wind speeds often hit 30–35 km/h, with gusts coming directly across the open water. This creates a high-pressure zone on the north- and west-facing walls of your home.
When that wind hits your siding, it doesn't just stay outside. It searches for every tiny gap around your window casings, electrical outlets, and baseboards, physically forcing freezing air into your living space. If you’ve ever noticed one room feels "colder" even when the furnace is running, it’s likely because that room is on the windward side of the house. For homes in our area, air sealing isn't just about comfort—it's about defending your home against the specific pressure of our local climate.
The "Stack Effect": Why Your House Acts Like a Chimney
Have you ever wondered why your floors feel like ice even when the thermostat is set to 21°C? The answer is often the Stack Effect (also known as the Chimney Effect). In the winter, the warm air produced by your furnace is lighter and less dense than the freezing Ontario air outside. This phenomenon causes the warm air to rise to the highest points of your home.
As that warm air rises, it looks for any "escape hatch"—like recessed lights, attic hatches, or gaps in your ceiling—to leak into the attic. When that warm air escapes out the top, it creates a vacuum at the bottom of your house. To balance the pressure, your home begins to suck in "make-up air" from the lowest levels. This means freezing air is pulled in through your basement rim joists, gaps in your baseboards, and even through electrical outlets on the main floor.
By professionally sealing the gaps in your trim and baseboards, we aren't just improving the room's look—we are "breaking the vacuum" and stopping your home from acting like a giant straw that sucks in the winter cold.
Key Takeaways
Thermal bridges are spots where heat flows easily through solid parts of a house, such as studs, concrete, and metal frames. They work together with micro air leaks to drain warmth and create cold strips on walls and floors. Even a well‑insulated wall can lose a lot of heat this way.
In many Ontario homes, thermal bridges and air leaks can waste 15–30% of heating energy every year. That can add up to hundreds of dollars on a typical Georgina heating bill. The colder the winter, the more money slips outside.
The most common thermal bridge locations include rim joists, window and door frames, wall corners, foundation edges, and attic penetrations. These spots often show cold drafts, condensation, or ghosting marks on paint and drywall.
Besides energy waste, thermal bridges can cause condensation, mould, and slow structural damage. Damp corners, musty smells, or peeling paint can all trace back to cold surfaces inside walls. Fixing the root cause protects both health and the building itself.
Cost‑effective fixes range from DIY air sealing and basic draft elimination to professional work such as rim joist insulation, attic sealing, and thermal breaks during renovations. Targeted work often pays back quickly during Canadian winters.
What Are Thermal Bridges, and Why Should Ontario Homeowners Care?
A thermal bridge is a path where heat moves more easily through the building than the insulation. In simple terms, it is a shortcut that heat uses to escape a warm room and reach the cold outdoors. Wooden studs, steel beams, and concrete slabs are all better at transferring heat than fibreglass or foam bats.
Think of a metal spoon in a mug of hot coffee. While the ceramic mug retains heat, the metal spoon quickly heats up and produces a hot sensation. In a wall, a stud or concrete beam plays the same role as that spoon. Heat travels along it, bypassing the fluffy insulation around it. That one swift path can lower the real performance of the whole wall.
Thermal bridges are different from general heat loss. All walls lose some heat based on their R‑value, and that is expected. With thermal bridges, the trouble is that the weak areas pull down the effective R‑value. A stud‑and‑batt wall rated at R‑20 on paper might act more like R‑13 because the studs keep stealing heat along the way.
In Ontario’s long, cold winters, this effect shows up fast. Large temperature differences between indoors and outdoors drive more heat along those “bridges.” The result is higher heating bills, rooms that feel drafty, and cold surfaces that attract moisture. Micro air leaks often show up at the same spots, which adds yet another way for warmth to escape. That is why understanding thermal bridges is relevant for any homeowner in Georgina or nearby towns.
The Hidden Costs Of Thermal Bridges For Energy, Comfort, And Structural Damage
Thermal bridges are easy to ignore because they sit inside walls and ceilings. Their impact shows up in the utility bill and in day‑to‑day comfort. Over time, they can even harm the house itself.
As many energy advisors like to say, “You pay for every hole in your building twice – once when you heat the air that leaks out, and again when you heat the air that leaks in.”
As far as finances are concerned, the costs add up quickly. Take a Georgina home with an annual heating bill of around $2,200. If thermal bridges and related air leaks account for even 15% of that loss, that is about $330 a year paid to heat the outdoors. Over ten years, that can mean saving on home gas, without counting future energy price increases.
Comfort is the next big cost. Thermal bridges create cold zones on walls, floors, and ceilings. When you sit near a cold outside wall, your body heat radiates toward it, causing the room to feel cooler than the thermostat setting. Drafts often appear near these cold zones, especially at rim joists, window frames, and attic hatches. The furnace may run more often, yet one room still feels chilly while another feels fine.
Then there is moisture. When warm indoor air touches a cool surface created by a thermal bridge, water vapour can condense. That shows up as foggy corners, wet window frames, or dark patches on drywall. Over time, damp areas can produce mould and mildew. Spores from that growth can trigger allergies, asthma, and other breathing issues. Musty smells in basements and closets on outside walls often point to this pattern.
Long-term, repeated dampness can weaken materials. Wood can rot, drywall can crumble, and metal fasteners can rust. Peeling paint, ghosting lines over studs, or ice dams along the roof edge are all warning flags. Left alone, these small signs can turn into bigger repair bills and a hit to property value. Buyers and home inspectors are paying more attention to energy performance and moisture problems, so fixing thermal bridges is also a smart move for resale.
Where Are Thermal Bridges Hiding in Your Home? A Room-By-Room Detective Guide
Thermal bridges hide in plain sight, but a focused walk‑through can reveal many of them. A cold snap is the perfect time to do this detective work. Begin your investigation in the basement and proceed to the attic to gain a comprehensive understanding.
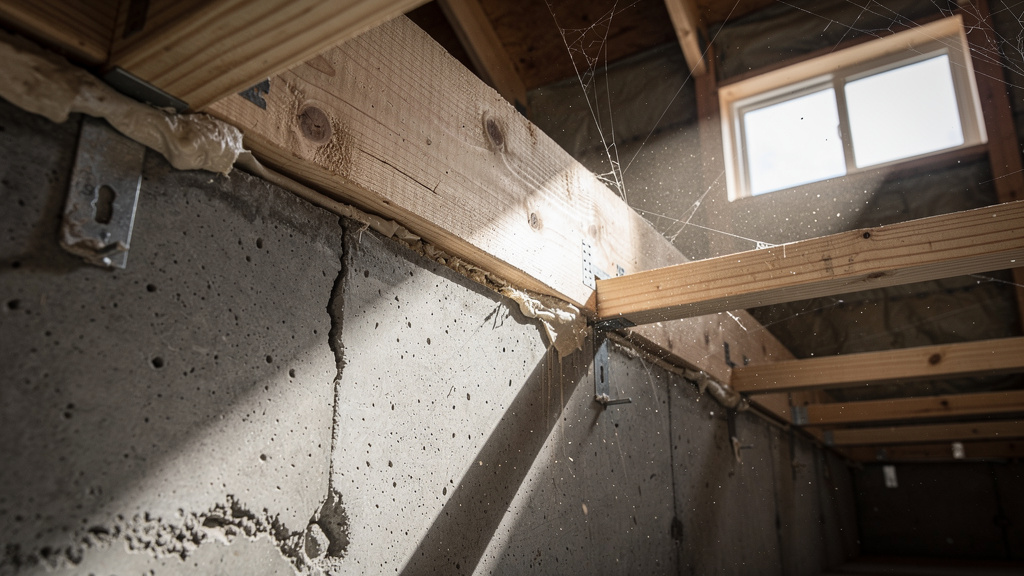 |
| "Exposed rim joist area in unfinished basement" |
Foundations & Basements
The basement is a common starting point for energy‑loss cold spots. The concrete itself is a strong thermal bridge, and the rim joist area often leaks.
Walk along exterior basement walls on a cold day and touch them with the back of your hand. If the walls feel freezing or damp, heat is likely flowing straight through the concrete. Cold floors above an unfinished basement or crawlspace can also point to heat loss at slab edges or along the top of the foundation.
Pay close attention to the rim joist, where the wood frame of the house meets the concrete wall. Gaps, bare wood, and visible cracks are common here. Musty odours, mouldy patches, or dark stains on lower walls can all suggest condensation on cold surfaces created by thermal bridges.
Exterior Walls
Exterior walls are full of framing members, so they are a prime place for thermal bridges. Every stud in the wall is a path for heat to leave.
On a cold day, slowly move a hand across an outside wall from floor to ceiling. Thin cold stripes that repeat every 16 or 24 inches often match stud locations. These stripes may also show as faint vertical lines or ghosting marks on the paint or drywall.
Check around windows and doors as well. Gaps at the trim, cracked caulking, and drafts suggest micro air leaks right beside thermal bridges in the framing. If there is a balcony or cantilevered section, feel the floor and wall nearby. These areas often act like fins, pulling heat out of the room.
Attics & Ceilings
Heat rises, so the attic area is a big target for both thermal bridges and leaks. Ceiling joists and trusses interrupt attic insulation and can create colder bands.
Look at the ceiling below the attic on a frosty morning. If there are lines of shadow or cold strips that match joist spacing, heat is moving along the wood. Also pay attention to the area around the attic hatch. A thin or unsealed hatch is like having a small open window into the attic.
Outside, check the roof after a snowfall. Uneven snowmelt, bare patches above certain rooms, or heavy icicles near the eaves can all suggest heat loss through joists and weak insulation at the roof‑wall edge.
Windows & Doors
Windows and doors naturally have lower R‑values than walls, but poor framing and air gaps can turn them into major thermal bridges.
Stand near each window and door on a windy winter day. Feeling cold air blowing in indicates a more significant issue than mere conduction. Look for moisture on the frames, especially at the bottom corners. Frost or water beads usually mean the frame or nearby wall area is much colder than the room air.
Metal frames, especially old aluminium units, transfer heat very quickly. The header above the opening can also be a strong thermal bridge. If there is a band of cold drywall directly over a window or door, that beam may be pulling heat right through the wall.
 |
| Show you how heat escapes through the tiniest holes |
Utility Penetrations
Where pipes, wires, and vents pass through walls or floors, both thermal bridges and micro air leaks are common. These spots are simple to miss.
Scan exterior walls for electrical outlets and switches. Those plastic covers may feel cool to the touch on a frigid day, and you may occasionally feel a light draft along the edges. Dryer vents, bath fans, and kitchen exhausts are also key spots. Check both inside and outside for gaps around the duct or pipe.
Where the main electrical service, cable, or gas line enters the house, look for cracks or rough openings. A small gap here can move a surprising amount of air and set up cold paths along nearby framing. Mark any suspect spots so they can be sealed later.
Three Types Of Thermal Bridges You Need To Know
Not all thermal bridges are the same. Knowing the main types helps match each problem with the right fix and avoid the same pattern in future work.
Material-Based Thermal Bridges
Material‑based bridges happen when a conductive material cuts through or replaces insulation. That material offers heat an effortless shortcut.
Common examples include wood or steel studs, balcony slabs, metal lintels over windows, and deck ledger boards that pass through the wall. Each one acts like a small radiator, pulling warmth from inside and dumping it outside. When numerous elements, like all the studs in a wall, align together, the cumulative impact can be significant.
In practical terms, we often handle these bridges by adding a continuous layer of insulation that conceals the conductors. That is why exterior foam or mineral wool is so powerful for walls and foundations.
Geometric Thermal Bridges
Geometric bridges come from the structure of the building rather than just the materials used. They appear where surfaces meet and an extra area is exposed to the outside.
Typical examples are outside corners, where two walls meet, and the junctions where walls meet roofs or foundations. These places often have more surface area outside than inside, so heat can flow out faster there. That is why the corners of rooms almost always feel colder in winter.
Effective design and careful insulation at these junctions can soften the effect. During renovations, special care to fill tight corner cavities makes a real difference later.
Construction-Related Thermal Bridges
Construction‑related bridges are tied to how work was done on site. They come from gaps, compression, and missed spots in the insulation and air barrier.
Examples include batts stuffed behind plumbing or wiring instead of cut to fit, empty pockets around window frames, and missing insulation above headers. Recessed lights that cut through attic insulation are another classic case. These bridges often live side by side with micro air leaks.
The upside is that many construction‑related bridges are the easiest to fix. Adding caulk, spray foam, or small pieces of rigid foam in these missed areas can sharply cut heat loss without major rebuilding.
Thermal Bridge Types At A Glance
Type | What creates it? | Common Locations |
|---|---|---|
Material‑Based | Conductive materials cutting through insulation | Studs, steel beams, balcony slabs, lintels, ledger boards |
Geometric | Building shapes with extra exposed surface area | Outside corners, wall‑to‑roof and wall‑to‑foundation junctions |
Construction‑Related | Poor installation, gaps, and compressed insulation | Around windows, headers, recessed lights, rim joists |
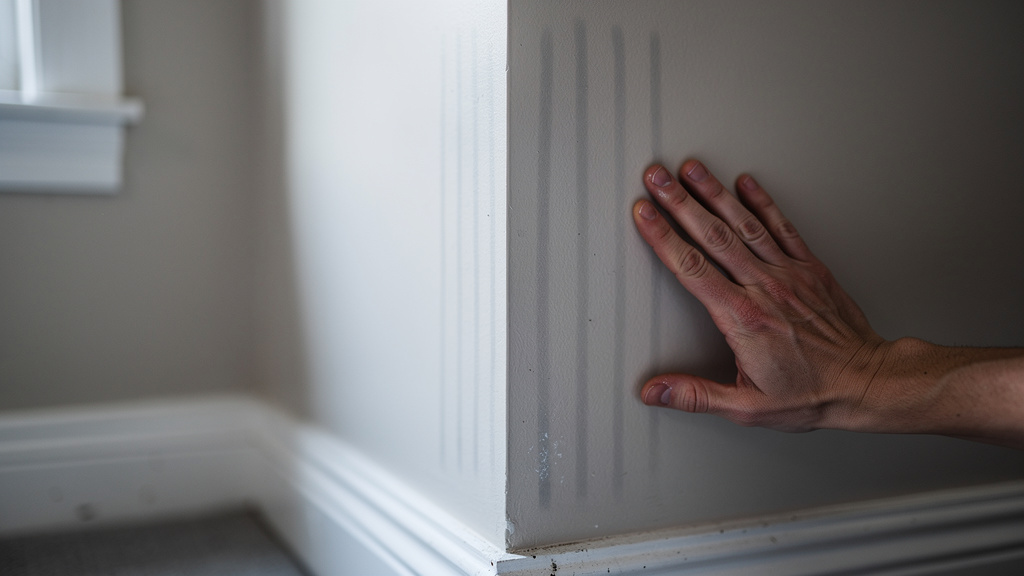 |
| "Hand checking cold exterior bridges" walls for thermal" |
DIY Detection—How To Find Thermal Bridges Without Expensive Equipment
Thermal cameras and blower door tests are excellent tools, but they are not the only way to track down trouble. With a bit of time on a cold day, a homeowner can learn a lot.
Building science educators often remind homeowners that “insulation without air sealing is like wearing a down jacket with the zipper left open.” Finding the gaps is the first step to closing that zipper.
The touch test is simple but surprisingly helpful. Turn up the heat on a cold, calm day so the inside of the house feels warm.
Then walk slowly along exterior walls, across ceilings below the attic, and over floors above unheated spaces. Employ the back of your hand, as it is more sensitive to temperature fluctuations. Sudden cooler bands, especially near corners, window frames, and floor lines, often mark thermal bridges or micro air leaks.
Visual Inspection Methods
Eyes can spot many clues that hint at hidden cold spots. Walk through each room and look closely at walls and ceilings on outside surfaces.
Watch for ghosting, which looks like faint grey or brown lines on painted drywall that match stud or joist spacing. Check for condensation on windows, especially at edges, and stains on ceiling corners. Peeling or bubbling paint near exterior walls can signal moisture from repeated condensation on cold surfaces.
Outside, study the roof and walls after fresh snow or a frost. Uneven melt patterns, bare patches, or frost lines that match framing all show where heat is escaping.
The Smoke Test For Air Leaks
The smoke test helps locate micro air leaks that often line up with thermal bridges. Pick a windy, cold day for the best results.
Close all windows and exterior doors, then turn on kitchen and bathroom exhaust fans to gently depressurize the house. Light an incense stick or smoke pencil and hold it near suspect areas like window trim, electrical outlets on outside walls, and the rim joist. If the smoke pulls sideways or gets sucked into a crack, there is an air pathway that needs sealing.
When To Call For Professional Thermal Imaging
DIY tests give a good start, but some issues stay hidden. That is when a professional thermal imaging scan is worth serious thought.
An infrared camera shows surface temperature differences in seconds, even inside finished walls. It reveals missing insulation, stud patterns, and moisture‑cooled spots that the eye cannot see. For Georgina homeowners planning a renovation or major comfort upgrade, JFB Painting and Handyman Services can help arrange energy audits that include this type of scan, so every dollar is aimed at the right place.
Proven Fixes For Eliminating Thermal Bridges In Existing Homes
Once we identify the worst thermal bridges, the next step is to select the appropriate fixes. Some are major projects, while others are simple upgrades with big gains.
Continuous Exterior Insulation As The Gold Standard
Wrapping the outside of a house with continuous insulation is one of the most powerful ways to cut thermal bridging. It puts a steady “coat” over studs, rim joists, and other conductors.
This approach usually uses rigid foam or mineral wool boards installed over the wall sheathing, then covered with new siding or cladding. It is best done during a re‑siding project or large renovation, since the exterior finish has to come off. A professional crew is needed to handle flashing, window details, and fastening.
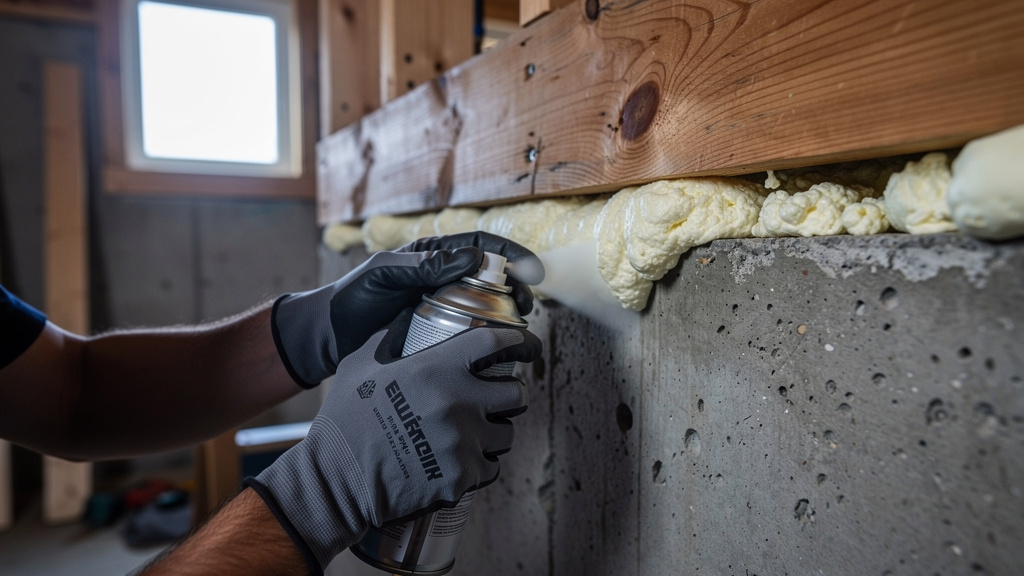 |
| "Applying spray foam to rim joist gaps" |
Targeted Rim Joist Insulation And Sealing
Rim joist insulation is one of the best draft elimination methods available for many homes. The area is often easy to reach from an unfinished basement and has a big impact.
A common method is to cut rigid foam pieces to fit each joist bay, then seal the edges with canned spray foam. This both insulates and air‑seals the rim. Handy homeowners can do these tasks with safety gear and patience or call a local service like JFB for a clean, fast job.
Interior Basement Wall Insulation
Bare concrete basement walls are strong thermal bridges. Insulating them from the inside can improve comfort on all levels of the house.
One effective method is to glue rigid foam boards directly to the concrete, tape the seams, then build a new stud wall in front if a finished space is desired. This keeps the concrete warmer and reduces the risk of condensation. Proper vapour control and detailing are important, so many homeowners bring in a contractor for this work.
Window And Door Upgrades
Old, leaky windows and doors often combine poor insulation with big air leaks. Upgrading them can greatly soften both conduction and drafts.
When frames are failing or single‑pane glass is still in place, replacement with high‑performance units is wise. Look for vinyl, fibreglass, or thermally broken aluminium frames and double‑ or triple‑pane Low‑E glass. Proper installation is key, since gaps around the rough opening can undo much of the benefit if they are not filled and sealed.
Comprehensive Air Sealing
Air sealing works hand in hand with thermal bridge fixes and should not be skipped. Many of the best home air sealing tips focus on common weak spots.
These include caulking around interior trim at windows and doors, adding weatherstripping to entry doors, and sealing cracks around utility penetrations with caulk or spray foam. Foam gaskets behind outlets and switches on exterior walls also help. Homeowners can handle a lot of this work, while JFB can tackle tight attics, tricky rim joists, and other hard‑to‑reach areas.
Attic Improvements
Attic work is often the fastest way to cut heat loss from above. The goal is to both stop air leaks and even out insulation.
Key steps include sealing around wires, pipes, and chimneys that pass through the attic floor, then adding insulation so it fully covers the joists. The attic hatch should be insulated and fitted with excellent weatherstripping. Baffles at the eaves keep ventilation paths open while still allowing full insulation depth over the wall plates.
Understanding Thermal Breaks As The Secret Weapon In New Construction And Major Renovations
When walls or roofs are already open for a renovation, it is much easier to keep future thermal bridges out. This is where thermal breaks come in.
A thermal break is a layer or part made from a low‑conductivity material placed between two conductive parts. It interrupts the heat path, so energy has a harder time slipping through. These breaks can live in window frames, structural beams, or the wall assembly itself.
Examples include thermally broken window frames, where a strip of plastic or composite separates inside metal from outside metal. Insulated headers place foam between pieces of wood over windows and doors. For balconies or large overhangs, special load-bearing insulation can be used where the slab passes through the wall. Builders also use staggered‑stud or double‑stud walls so that interior and exterior studs do not touch, allowing insulation to form a clean buffer between them.
For homeowners planning additions, new siding, or major interior work, asking contractors how they plan to include thermal breaks is wise. JFB Painting and Handyman Services can help Georgina clients think through these details and suggest moisture‑resistant products, such as foam board, when working on renovation projects.
The Role Of Insulation: Why More Isn't Always Better (But Better Is Better)
Adding more insulation is helpful, but only up to a point. How it is installed and how continuous it is matters just as much as thickness.
Effective R-Value vs. Nominal R-Value
The R‑value printed on an insulation package is the nominal R‑value. It tells how that material performs in a test, not how the whole wall behaves.
In a real wall, wood studs, headers, and gaps reduce the effective R‑value. For example, a 2×6 wall filled with R‑20 batts might act closer to R‑13 or R‑15 once thermal bridges through studs are counted. That means simply stuffing more batt insulation into the same framing does not resolve the core issue.
Continuous insulation (CI) is an effective strategy for addressing thermal bridging.
Continuous insulation (CI) is insulation that runs across the outside (or sometimes inside) of a structure with no breaks at studs, plates, or floor edges. It is a powerful answer to thermal bridging.
In many walls, CI is created by placing rigid foam or mineral wool boards over the sheathing before installing siding. This layer smooths over all the framing members, so heat must pass through insulation almost everywhere. That steady “blanket” raises effective R‑value and makes interior surfaces feel more even in temperature.
Choosing The Right Insulation For Thermal Bridge Applications
Different insulation types shine in different spots. Matching them to specific thermal bridge problems gives the best results.
Rigid foam boards work well for exterior walls, basement walls, and slab edges because they handle moisture and provide high R‑values per inch.
Spray foam is strong where air sealing and insulation are both needed, such as at rim joists and around complex penetrations.
Batt insulation is still fine in open cavities if it is cut neatly and not compressed.
Mineral wool offers better fire resistance and moisture tolerance in some situations.
Thinking about where the thermal bridge sits and how air might move there helps pick the best product.
Home Air Sealing Tips As The Perfect Partner for Thermal Bridge Elimination
Thermal bridges move heat through solid parts of the house, while air leaks move heat out by carrying warm air with them. Both often occur at the same locations, so tackling them together makes sense.
Why Air Sealing And Thermal Bridge Elimination Work Together
When air is allowed to move through gaps, it washes across cold surfaces created by thermal bridges. This speeds up heat loss and can bring more moisture to those chilly spots.
By sealing gaps and cracks, convective heat loss drops, and air no longer feeds condensation on cold framing or concrete. Combined with better insulation, this one‑two punch often cuts heating costs by 10–20%. It also makes the best draft elimination efforts far more noticeable in daily comfort.
Top Priority Air Sealing Locations
Some locations should rise to the top of any air sealing list. These are the usual suspects in Ontario homes:
Attic access hatch—needs both insulation and a tight gasket.
Rim joist cavities—around the basement ceiling, often sealed with spray foam or foam board plus caulk.
Windows and doors—gaps between trim and wall should be caulked; frames need adequate weatherstripping where they move.
Utility penetrations—pipes, wires, and vents—should be foamed or caulked from both inside and outside where possible.
Sill plate to foundation joint—the line where the wood sill sits on the concrete wall is another common leak point.
Best Materials For The Job
Picking the right sealant helps the work last. Different gaps call for different products:
Caulk for small cracks where materials do not move much, such as trim joints.
Weatherstripping for the edges of doors and windows that open and close, with compression seals and V‑strips as common options.
One‑part spray foam for medium gaps around pipes and wires.
Foam backer rod is pushed into wide cracks before caulking, so the sealant has something to rest on.
Using the proper product in each spot keeps seals flexible and tight over time.
When to call JFB for air sealing?
Some air-sealing tasks are awkward, dirty, or risky for a DIY attempt. That is when a local handyman is helpful.
Areas like cramped attics, tight crawlspaces, and intricate rim joist bays often need ladders, safety gear, and experience. Spray foam use, especially in larger areas, calls for proper masks and care. JFB Painting and Handyman Services helps Georgina homeowners by handling these tougher tasks, combining air sealing with related work such as a minor framing repair or paint touch-up after gaps are sealed.
Stop Cold Walls In Your House: Room-Specific Strategies That Work
“Stop cold walls in the house” is one of the most common comfort wishes in winter. Different rooms call for slightly different tactics, but the pattern repeats.
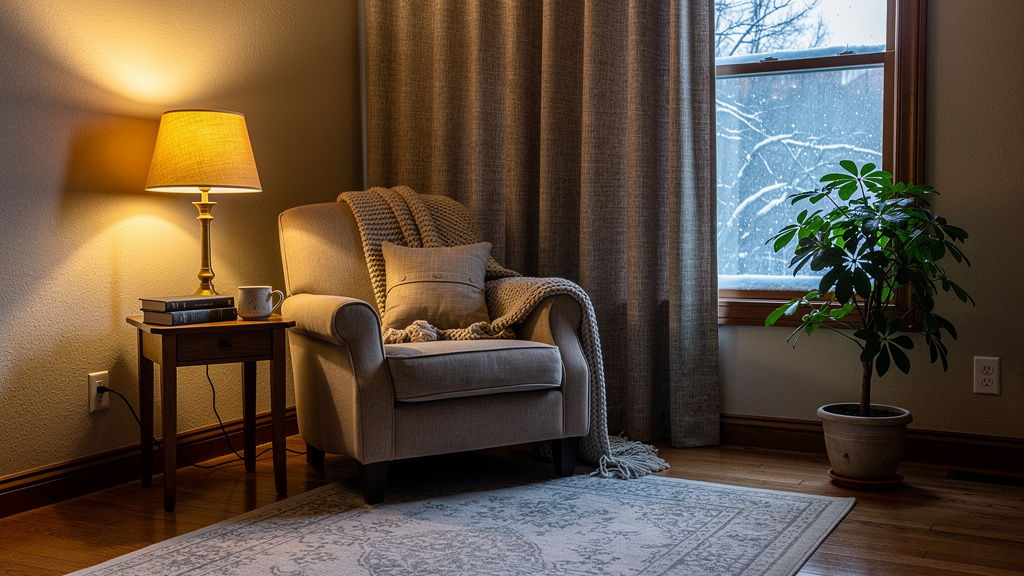 |
| "Cozy living room with insulated curtains and warmth" |
Addressing Cold Exterior Walls
For a quick fix, start with sealing gaps along baseboards and window trim on exterior walls. Even small cracks can leak cool air that makes the wall feel colder.
Helpful short‑term steps include:
Use thick, insulated curtains to reduce heat loss through windows, but avoid covering heat registers.
Consider moving large furnishings a few centimetres away from the cold walls to allow warm air to circulate behind them.
Sealing obvious cracks in plaster or drywall is crucial to prevent air from sneaking through.
As a deeper upgrade, adding interior foam board and new drywall or planning for future exterior insulation are solid long‑term answers.
Fixing Cold Basement Walls And Floors
Basements often feel chilly even with a heater running. The concrete walls and slab can pull heat away from the space above.
Insulating foundation walls with foam board, as discussed earlier, raises the temperature of both walls and nearby floors. Sealing and insulating the rim joist should be the first insulation step, as it often brings immediate comfort gains on the main floor. Adding insulated subfloor panels or thick area rugs over concrete can alleviate cold floors in finished spaces.
Dealing With Cold Corners
Corners of rooms are classic geometric thermal bridges. They have more exterior surface per bit of interior wall.
During renovations, asking for careful insulation placement in corners helps avoid unfilled gaps. There are also insulated corner beads and detailing tricks that keep more insulation in place at these junctions. As a temporary measure, avoid pushing large dressers or beds tight into cold corners so air can circulate and moisture has less chance to sit in hidden pockets.
Warming Up Cold Floors Over Garages Or Crawlspaces
Rooms over garages or unheated crawlspaces often feel chilly underfoot. The floor structure is directly above cold air or cold concrete.
Insulating the underside of the floor joists, paying special attention to the band joist at the edges, can make a big difference. Air sealing any gaps where ducts, pipes, or wires pass between the garage and the living space is also important for both comfort and safety. If the area is hard to access or ventilation is tricky, a professional assessment can help pick the safest and most effective path.
The Ontario Context: Why Thermal Bridges Are Especially Problematic In Our Climate
Ontario’s climate makes thermal bridges more than a minor annoyance. Local weather patterns amplify their effect.
Winter home prep in Georgina and nearby towns often sits far below freezing for long stretches. That big difference between indoor and outdoor temperatures drives more heat through every thermal bridge. Long cold snaps also mean more time for condensation to form on chilled wall and ceiling areas.
Freeze‑thaw cycles add another layer of strain. Moisture that enters small cracks can freeze, expand, and slowly widen gaps in mortar, concrete, and wood joints. Over years, this cycle can turn a small weakness into a larger structural concern. The Ontario Building Code has responded by pushing builders to think about effective R‑value and airtightness, not just stuffing more insulation into cavities.
For existing homes, programs such as the Canada Greener Homes Grant can help offset the cost of upgrades like better insulation and new windows. JFB Painting and Handyman Services works with Georgina homeowners who want to bring their older homes closer to modern standards, taking local weather and code requirements into account when planning work.
Calculating Your Savings: The Real ROI Of Fixing Thermal Bridges
Addressing thermal bridges is not just about comfort. It also has clear financial rewards over time.
Annual Energy Waste From Thermal Bridges
Most Ontario homes spend between $1,800 and $2,500 per year on heating. Thermal bridges and related leaks can waste 15–30% of this energy, amounting to an annual loss of $270 to $750.
Even before any price increases, the wasted energy could cost between $2,700 and $7,500 over a ten-year period. In other words, money spent on fixing the worst thermal bridges often comes back in lower bills over a reasonable period.
Quick Wins For Air Sealing ROI
Air sealing is usually the fastest way to see savings. A couple of tubes of caulk, weatherstripping, and foam gaskets for outlets cost between $50 and $200 for most homes.
Done carefully, these upgrades can shave 10–20% off heating bills. That means payback can happen within a single winter or two. Hiring a handyman like JFB for a specific air sealing service costs more than DIY materials but often finishes the job faster and more completely.
Major Investments: Insulation And Window Upgrades
Bigger projects have longer paybacks but also broader benefits. Rim joist insulation and sealing by a pro might cost between $200 and $600 and save $80 to $150 per year in heating. That points to a simple payback of about four to five years.
New windows can run from $3,000 to $10,000 or more, depending on size and quality, but can cut heating and cooling use by $200 to $400 a year. Exterior insulation and new siding are larger projects again, yet they improve comfort, reduce drafts, and protect the structure.
Beyond Energy: The Intangible Benefits
Savings on utility bills are only part of the story. A warmer, more even temperature throughout the house has real day‑to‑day value.
Reducing cold surfaces and damp spots can improve indoor air quality and lower mould risks. The house may need less frequent repainting and fewer drywall repairs. Energy-wise upgrades can also raise resale appeal, as many buyers now ask about comfort and efficiency. All of these factors add to the return on work done to address thermal bridges.
DIY vs. Professional: Making The Right Choice For Your Thermal Bridge Fixes
Some thermal bridge fixes are perfect DIY. Others benefit from pro tools, safety gear, and experience. Knowing the difference keeps projects safe and effective.
DIY-Friendly Thermal Bridge And Air Sealing Projects
Homeowners with basic tools can handle many small tasks, such as
Caulking gaps at window and door trim.
One common task is to add or replace the weatherstripping on doors.
Installing foam gaskets behind outlets on exterior walls is another common task.
Another common task involves enhancing the insulation surrounding a basic attic hatch and incorporating weatherstripping into it.
These jobs usually take a few hours and cost under a few hundred dollars in affordable materials. Hardware stores often provide advice and product guides, and online videos can show proper techniques.
When To Call A Professional Handyman Like JFB
Some projects benefit from a steady hand and proper safety steps. Rim joist insulation in tight spaces, detailed air sealing in attics, and working around chimneys or high exterior points can all be awkward and risky.
Spray foam use in particular calls for respirators, eye protection, and care to avoid trapping moisture. Assessing how ventilation, vapour barriers, and insulation interact comes with experience. JFB Painting and Handyman Services provides Georgina homeowners with a combination of practical knowledge, proper tools, and insured work, as well as the capability to repair drywall and paint once the sealing is complete.
When To Call Specialized Contractors
Larger upgrades move beyond the scope of a handyman and call for dedicated crews. Full attic spray foam jobs, whole‑home window and door replacement, and exterior insulation plus re‑siding are examples.
Structural repairs where framing has rotted or concrete has spalled, as well as projects that need permits, are also in this category. In these cases, JFB can help homeowners by recommending trusted local contractors and coordinating prep or follow‑up work such as interior repairs and painting.
The JFB Advantage For Thermal Bridge Projects
JFB Painting and Handyman Services brings strong local experience to Georgina‑area homes. That includes seeing the same common weak spots in many similar houses and knowing which fixes give the best value.
Because JFB also provides painting, drywall, and general handyman work, thermal bridge and air sealing upgrades can be combined with cosmetic touch‑ups and annual maintenance in one visit. We prioritize clear communication, fair pricing, and long-lasting work over quick patch jobs. For homeowners who want a house that feels better every winter, this kind of steady, practical support goes a long way.
FAQs
What Is The Difference Between A Thermal Bridge And An Air Leak?
A thermal bridge is a solid path that lets heat pass easily through the building, such as a stud, beam, or concrete section. An air leak is a gap or crack that lets warm air move out and cold air move in. They often appear in the same spots but work in different ways. Fixing both conduction through materials and air movement provides the best comfort and energy savings.
How Much Heat Loss Is Actually Caused by Thermal Bridges?
Studies of wood‑framed houses show that thermal bridges can cause 15–30% of total heat loss. Homes with steel framing or large concrete balconies can lose even more heat this way. In well‑insulated homes that have not addressed thermal bridges, these weak paths can dominate energy loss. The exact number depends on construction type, age, and local climate.
Can I See Thermal Bridges Without Special Equipment?
Often, yes. On a cold day, thermal bridges may show as ghosting lines on walls, condensation in corners, or frost patterns on windows. Uneven snowmelt on the roof and cold stripes felt by hand along walls also give clues. Thermal imaging, however, shows the full picture by mapping surface temperatures across every wall and ceiling.
Are Thermal Bridges More Of A Problem In Older Or Newer Homes?
Older homes often have little insulation and many direct paths for heat, so thermal bridges are common and obvious. Many newer homes added more insulation but kept standard framing details that still create bridges at studs, headers, and corners. Very recent homes built to higher energy standards often do better, yet still may not fully avoid bridging. In all cases, construction quality and any retrofit work matter as much as age.
What's The Single Most Cost-Effective Thermal Bridge Fix For My Money?
For many Ontario houses, sealing and insulating the rim joist is the best first step. This narrow band at the top of the foundation often combines thermal bridges with micro air leaks. Materials and labour costs are modest compared with whole-house work, but the area can account for a noticeable amount of heat loss. Comprehensive air sealing throughout the house follows close behind as another low‑cost, high‑impact upgrade.
Will Fixing Thermal Bridges Also Help With My Summer Cooling Costs?
Yes, it will. The same paths that let heat out in the winter let it in during the summer. By improving insulation at thermal bridges and cutting air leaks, indoor temperatures stay more stable in hot weather. That can reduce air conditioning use, lower summer energy bills, and keep rooms on the sunny side of the house more comfortable.
Do I Need To Fix All Thermal Bridges At Once, Or Can I Prioritize?
You can absolutely take a staged approach. A common order is to start with rim joists and attic air sealing, then move to windows and doors when they need replacement, and plan for basement or exterior wall upgrades later. Even a few targeted fixes can improve comfort and cut bills. JFB can help set up a phased plan that fits both the house and the budget.
Conclusion
While thermal bridges and micro air leaks may remain hidden, their effects are readily apparent. Cold spots on walls, stubborn drafts, condensation on windows, and rising heating bills are all signs that heat is slipping away along paths it should not have. Left alone, these weak points can breed mould, damage materials, and drain money year after year.
Fortunately, homeowners can overcome these issues. With simple tests, it is possible to find the worst trouble spots. Small steps such as air sealing, weatherstripping, and rim joist insulation can bring immediate comfort gains and real savings. Larger projects like new windows, basement insulation, or exterior foam can be timed with other upgrades and backed by rebates.
JFB Painting and Handyman Services provides homeowners in Georgina and nearby communities with practical assistance at every stage. JFB connects comfort and aesthetics, from caulking leaky attic penetrations to fixing drywall following condensation damage and painting on a budget. That means a warmer, drier, better‑looking home that feels enjoyable to live in.
There is no need to face another winter with cold walls and money drifting out through hidden gaps. Start with a simple walk‑through, pick one or two high‑impact fixes, and build from there. When it is time for expert hands, JFB is ready to help turn those invisible bridges into solid comfort.
 |
| This image illustrates where your heat loss is being extracted. |
Regards,
Ready for a Home Makeover?
Stop putting off those repairs! We specialize in expert painting and reliable handyman services right here in the area. From applying a fresh coat of paint to fixing nagging household issues, we handle the hard work so you don't have to.
[Click Here to View Our Full Services List] Get a Free Estimate Today!
About the Author – JFB Handyman
JFB Painting and Handyman Services has been proudly serving homeowners since 2018, providing reliable, detail-focused home maintenance, repairs, and improvement services. With years of hands-on experience solving real foundation, soil, drainage, and structural issues, JFB Handyman brings practical knowledge to every project and every article.
From small fixes to complex home challenges, the goal has always been the same: deliver honest workmanship, protect your investment, and help homeowners understand how to keep their property in top condition. This commitment to quality, transparency, and long-term solutions has made JFB Handyman a trusted name in local home repair.


No comments:
Post a Comment