June 24, 2024
In this article, I will show you how simple and enjoyable it is to make awesome-looking planters to display around your home, such as on your deck or in front of the house. When a plant is placed on a planter stand, water can flow from the plant being displayed. Adding protection to your plants, herbs, and vegetables will keep them from drowning in excess water.
Let's get started with this DIY project.
Step One:
How large you cut your piece for your project will depend on the size of your planter. Any size you need can be cut to suit your planter. Prior to making any mitre saw cuts, I like to paint or stain my wood.
Step Two:
The two front legs should be cut first, followed by the back legs, which should be longer than the front legs. The sizes of both legs will vary based on the size of the planters you wish to display. For instance, my back legs will be 16" or longer, depending on how you want them to look, if my front legs are 8".
 |
| These are the finished steps for your step planter |
Step Three:
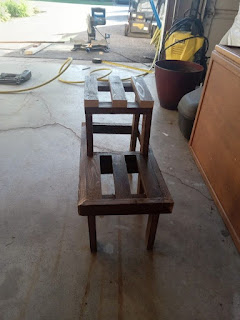
I'll attach the front and back legs with my brad nailer, making sure to leave cross cuts for the planter to rest on. I start with the front legs and work my way back. If you examine the images I've included, go over picture number two to see more specifics about the intended appearance.
 |
| This is the first step for your planter |
Step four:
Attach your cross piece to the front legs by nailing it there with your brad nailer or by hand. Next, attach the piece that will support your planter to the back legs by doing the same. Examine image number four for further information and an idea of how it should initially appear.
 |
| As you can see, we are now going to connect the first step to the second step |
Step five:
Here, you will cut a long piece from the front to the back in order to attach the front step to the back step. Cut two identically sized long pieces, being sure to make a 45-degree cut at each end for a refined appearance. Then, with 45-degree cuts at each end, you will cut two pieces to fit between the two long cuts.
 |
| You have attached the bottom step to the top step |
Step Five:
To make your planter look amazing, repeat step five on the top planter. Cut two identical pieces for each side of the planter, making sure to cut each end at a 45-degree angle to ensure a proper fit.
 |
| I have placed the trim around the first step |
 |
| Side view of how it is going to look |
Step six:
You have completed your project; now it is time to display your planters on the step planter you have just created. You can make it three steps by repeating each step for each planter. Hope you have enjoyed this tip on how to make a step planter.
 |
| This is the finished look |
MaterialsI used:
1"x2"x8" spruce wood or any type of wood you like.Brad Nailer
Hammer
Stain or paint
Mitre saw for nice clean cuts
Paint brush
If you have any questions or feedback, feel free to leave a comment.
We appreciate you visiting our site and your comments on our subjects. Subscribe to our blog to get a copy of "Repair Smart: Money-Saving Maintenance Hacks for Homeowners." This ebook offers practical advice on how to control expenses for your do-it-yourself house renovations. Simply leave a comment to request a free copy of our ebook.
Request a complimentary copy of this ebook. |


