Wednesday, September 25, 2024

"Discover How to Complete Your Honey-Do List and Make Your Partner Happy"

September 25, 2024

How to Make Your Spouse Happy: Finish Your Honey-Do List

Are you fed up with a never-ending list of tasks that keeps expanding? Would you like to brighten your partner's day (and potentially receive some additional gratitude)? It's time to tackle those nagging honey-do projects.

Why Outsource Your Honey-Do List?

  • Save time and energy by letting a professional handle the tedious tasks, allowing you to relax or spend quality time with your family.
  • Ensure guaranteed quality by hiring experts with the necessary skills and experience to complete the job correctly the first time.
  • Peace of Mind: Knowing your honey-do list is being taken care of can reduce stress and tension at home.

Common Honey-Do Projects

  • Painting: Ceilings, baseboards, trim, and rooms can all benefit from a fresh coat of paint.
  • Baseboard and Trim Upgrades: Update your home's interior with stylish new baseboards and trim.
  • Door Repair: Fix squeaky, sticking, or damaged doors for a smooth and functional home.
  • Faucet Replacement: Upgrade your kitchen or bathroom with new faucets for improved style and function.
  • Wall and Ceiling Repairs: Patch holes, cracks, or water damage to restore your home's appearance.
  • Electrical Updates: Replace outdated light switches and receptacles for safety and convenience.

Let Us Help You

No matter how big or small your honey-do list is, we can help you get it done. Contact us today for a free, no-obligation quote and let us take care of those pesky projects.

Why Choose Us?

  • Experienced Professionals: Our team has years of experience tackling various home improvement tasks.
  • Quality Workmanship: We guarantee high-quality results that will exceed your expectations.
  • Affordable Rates: We offer competitive pricing without compromising on quality.
  • Customer Satisfaction: Your satisfaction is our top priority.

Don't Let Honey-Do Projects Stress You Out

Let us handle your honey-do list while you enjoy a more relaxed and harmonious home life. Reach out to us now to arrange a consultation and initiate your home enhancement journey.


Upgrading your baseboards or trim

Changing the look of your wall by adding a portable fireplace and your TV

Adding bi-fold doors to your closet

Improving the look of your side entrance

Painting your garage doors

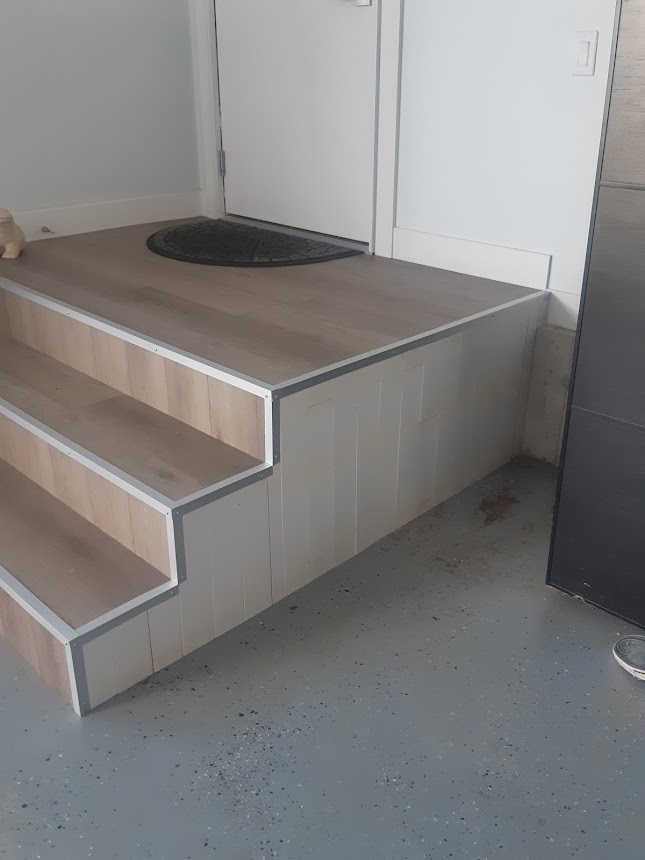
Changing the look of your stairs


Contact us now.

jfbmarketing@gmail.com
647-244-7891


We appreciate you visiting our site and your comments on our subjects. Subscribe to our blog to get a copy of "Repair Smart: Money-Saving Maintenance Hacks for Homeowners." This ebook offers practical advice on how to control expenses for your do-it-yourself house renovations. Simply leave a comment to request a free copy of our ebook.

Request a complimentary copy of this ebook.


Monday, September 9, 2024

How to install a cat door on an existing interior door.

September 9, 2024 

How to install a cat door on an existing interior door.

This article will describe the process of installing a cat door in conjunction with an existing interior door.
After the installation is completed, your cat or small dog will be able to enter any room that you choose. It enables your pet to enter without requiring you to open the door, thereby granting her the freedom she deserves. Use this great idea to benefit yourself and your pet. Discuss the steps needed to start this project.

First step:

There is a wide variety of options available to you when selecting the door that you want to have installed. It occurred to me that Amazon offers a fantastic selection of cat doors at affordable prices. You can look around and see all of your options, prices, and detailed instructions for completing the task.

Second Step:

The majority of hinges have three or four screws attached. We previously mentioned removing the door from its jams as the next step. It appeared to be much simpler to remove the center bolt that was holding the two hinge screws apart than it was to simply remove all of the screws and leave the hinge attached. Your choice will save you time and be the most suitable for you.

Step Three:

Immediately after removing your door, avoid hitting it or leaving dents or marks. Position the door on a safe, level table; I used a black and decker worktable for this purpose. Once the door is in a flat position on the table, mark the centre of the door and prepare to take measurements. Next, position your template in the centre of the door, ensuring it aligns with the bottom of the door located inside your home.


Step Four:

If you have a template, apply paint tape to its outside. This will prevent your jigsaw from leaving a scratch on your door's exterior. This method not only saves time and ensures a neat process, but it also eliminates the need to touch up the door with the same paint color as your interior door. This is a significant benefit.


Step Five:

You will cut around the template with a jigsaw blade that is of high quality and sharpness. If you want your cut to have a pleasing finish, you should go very slowly for it. Please keep in mind that there will be a piece of wood that serves as a support at the bottom of the door. As soon as you have cut that piece, the remaining portion of the door ought to be hollow and relatively simple to cut.

Step Six:

After you have cut the opening for the door, you may want to lightly sand it to ensure that it is smooth and well-finished before you put together the two sections of the cat door. To position the cat door piece's opening, begin at the back of the door and then gently flip it over. After that, manually install the screws using the provided hardware. Do not make use of a drill.


Step Seven:

Test the door to confirm its correct opening and secure fastening. If everything goes according to plan, you are well on your way to the final stage. After mounting the door, place it back on the door jambs.

Step Eight:

I hope this was helpful. If you have any questions, I would appreciate it if you could send me a message. Or if you would like to provide some feedback by leaving a comment.


 Conclusion

Installing a cat door on an existing door offers numerous advantages for both cats and their owners. Cats become more independent, have access to exercise and fresh air, and can relieve themselves when necessary, all of which help them feel less stressed and anxious. Cat doors are convenient for owners, shield doors from harm, and help keep the house cleaner. The overall benefits of a cat door make it a worthwhile addition to many homes, improving the wellbeing of both cats and their human companions, even though it's crucial to take into account aspects like security, weatherproofing, and initial training.

Regards,

Joseph Botelho


We appreciate you visiting our site and your comments on our subjects. Subscribe to our blog to get a copy of "Repair Smart: Money-Saving Maintenance Hacks for Homeowners." This ebook offers practical advice on how to control expenses for your do-it-yourself house renovations. Simply leave a comment to request a free copy of our ebook.

Request a complimentary copy of this ebook.


Friday, July 5, 2024

How to stain and understand the steps to take to properly stain like a pro

May 5th, 2024

Staining wood can be done with a professional finish! Here's a breakdown of the steps involved, with a focus on using a brush: Understanding the procedures will ensure that your project turns out beautifully. Staining wood differs greatly from painting. 

We will go over all you need to know and how you will be impressed by your results. 

Preparation is Key:

Sanding:

This produces a surface that is smooth enough to absorb stains evenly. For wood that has already been finished, use 120-grit sandpaper; for bare wood, use 80-grit; and for all surfaces, use 180-grit. Use a tack cloth to remove dust.

Give your wood a smooth sanding


Pre-conditioning (optional):

Use of a pre-stain conditioner should be considered for softwoods such as pine. This lessens the likelihood of applying blotchy stain. Apply using a foam brush, allow to dry as directed by the product, and then remove any leftovers with a clean cloth.

How to apply the stain:

Brush Choice:

Synthetic brushes are appropriate for water-based stains, but natural bristle brushes perform better on oil-based stains. Select a premium brush with non-stretching, soft bristles. This is a crucial choice that will affect the kind of stain you use. 

One of the best brushes for applying stain is a natural bristle brush because it can be cleaned and used again for several projects. The best brushes to use with 100% acrylic and oil or acrylic stains are synthetic ones. It's not like natural bristles that will go limp.

My choice for staining


Stain Application:

Before using the stain, always give it a good stir. Stain should be applied in light, even coats, following the grain. Use a fresh, lint-free cloth to quickly wipe away any excess stain in the direction of the grain. Using these techniques will enhance the finished look of your work. 

Building Colour:

For a deeper colour, apply additional thin coats only after the first coat has completely dried (see the stain can's drying time). Recall that adding more stains is simpler than removing them.

Expert Advice on Brushwork:

Let's go over the procedures you must adhere to in order to finish any project you undertake flawlessly. Whether you're staining a wooden swing set, a deck, or any other wood project you've got planned,.

Work in sections: To prevent uneven drying, apply stain to small, manageable sections at a time.

This is the correct way to stain

Incorrect way, you can see the uneven application of the stain 


Maintain a wet edge: To guarantee even application, dip your brush frequently and leave a wet edge on the stain as you work.

Wipe thoroughly: It's imperative to remove excess stains as soon as possible to achieve a polished appearance. Keep the stain from collecting on the surface. One of the most common mistakes people make when staining is this:.

Clean your brush: After staining, store your brush carefully after giving it a thorough cleaning with the suitable solvent (water for a water-based stain, mineral spirits for an oil-based stain). To keep your brush wet until I need it again, I wrap it in saran wrap while I'm taking a break. 

Additional Tips:

Testing the Stain:

Test not only the stain colour but also the wiping times! Stain a scrap piece, allow it to sit for varying amounts of time (30 seconds, 1 minute, 2 minutes, etc.), and then remove it with a cloth. This will demonstrate how the stain penetrates the wood and how the length of time you leave it on before wiping affects the final colour.

Drop Cloth Magic:

Use a plastic drop cloth that drapes over the floor and has slightly folded edges for the best results. This will capture any spills or drips and simplify cleanup. Another useful trick with painter's tape is to draw straight lines around the edges of your workspace to keep stains from seeping onto surfaces you don't want coloured.

Ventilation Ventilation Ventilation:

This only applies if you are working indoors; otherwise, take safety measures. Stains can release strong fumes, particularly those that are oil-based. To promote proper air circulation, open the doors and windows. Try to work outside on a day with little wind. When handling stains, always wear a respirator made for organic vapours, and make sure you follow the manufacturer's instructions for safe usage. 

Conclusion

You will obtain results that a professional would provide if you follow the above steps. This deck serves as an illustration of a stain job done differently. The difference will be apparent to you right away. While one section was completed erroneously, the other section adhered to the right procedures.

You will notice the difference with the staining process

Feel free to leave your feedback or any question you may have. 


Regards,

Joseph
JFB Painting and Handyman Services. 

We appreciate you visiting our site and your comments on our subjects. Subscribe to our blog to get a copy of "Repair Smart: Money-Saving Maintenance Hacks for Homeowners." This ebook offers practical advice on how to control expenses for your do-it-yourself house renovations. Simply leave a comment to request a free copy of our ebook.

Request a complimentary copy of this ebook.


Wednesday, June 26, 2024

"Comprehensive Painting and Handyman Services Yielding Exceptional Results"

Jume 26, 2024

"Comprehensive Painting and Handyman Services Yielding Exceptional Results"

Not only do we paint walls, but also ceilings, baseboards, and doors as part of our comprehensive painting service. This comprehensive method guarantees that your entire room will have a consistent and refined appearance. A cohesive and aesthetically pleasing design that expresses your personality can be yours with a little bit of coordinated painting of all these components. In order to increase the value and aesthetic appeal of your home, our professionals will meticulously prepare and paint every surface.

Convenience: Homeowners often struggle with the logistics of a painting project. Your services simplify their lives by handling all aspects of them, from surface preparation to cleanup. They don't need to worry about purchasing supplies, moving furniture, or dealing with the mess.

Professional expertise: Your team of skilled painters ensures a high-quality finish. Whether it's selecting the right paint type and colour or achieving smooth, even coats, your expertise ensures that the result meets or exceeds the client's expectations.

Some of the changes I made in my House


Handyman Services:

In addition to painting, we offer a comprehensive range of handyman services to cater to all home improvement requirements. From little repairs and fixes to more involved projects, our knowledgeable staff can manage it all. We can help you with shelf installation, door squeaks corrected, or leaky faucets fixed. By offering a handy solution for both cosmetic improvements and functional repairs, this one-stop shop approach saves you time and effort and guarantees that your house is always in excellent shape.

Baseboard and Trim Replacements: 

One transformative approach to improving the look of a room is to replace baseboards and trim. Often disregarded components can greatly affect the general ambiance and design of a space. Selecting new baseboards and trim will help homeowners match particular design themes, add classic appeal, or even produce a fresh, modern look. Our professional replacement services will let you easily modernize the inside of your house and get a very customized look.

Enhancing Property Value: 

By providing comprehensive remodelling and enhancement services, you're not just making homes more visually appealing but also potentially increasing their resale value. A well-maintained and upgraded home is more attractive to potential buyers.

Personalized Service:

My team can work closely with homeowners to understand their preferences and provide personalized recommendations. This ensures that the remodelling work aligns with the client's vision and style.

Efficiency: With your services, homeowners can complete their remodelling projects efficiently. There's no need to coordinate with multiple contractors or spend weeks or months on a project. Your streamlined approach saves time and minimizes disruption.

Quality Materials:

Using high-quality paints, baseboards, and trim materials ensures longevity and durability. This means that homeowners can enjoy the results of their investment for years to come without worrying about premature wear and tear.


Nice tight corner on baseboard
picture of baseboards
Ceiling painted


Finished Baseboards


JFB Painting and Handyman Services
647-244-7891

By clicking on my name it will access you to an ebook I wrote on this topic. 

hashtag


hashtag


How to improve the look of your deck with stain

Deck Revival:

Staining for Stunning Results (DIY or Pro Options!)

Does your deck look aged and worn? Staining your deck is a budget-friendly and impactful way to breathe new life into your outdoor space. Not only will a fresh coat of stain dramatically enhance your deck's appearance, but it also provides essential protection against the elements, extending its lifespan for years to come.

Are you considering tackling this project on your own? We've got you covered! Below, we'll provide a step-by-step guide to DIY deck staining. However, if you prefer a professional touch, I'm delighted to help! Contact me today for a free consultation.

My Contact Information


Preparation is key.
  1. Clear the Deck:
  2. Remove all furniture, grills, and plants to give yourself a clean work area.
  3. Deck Inspection:
  4. Look for any loose boards, splinters, or warping. Fix any issues before staining for a smooth finish.
  5. Deep Cleaning:
  6. Sweep away debris and thoroughly clean the deck with a wood cleaner. This removes dirt, mildew, and anything else that might prevent the stain from adhering properly.

Stain Selection and Application:
  • Choosing Your Stain:
Head to your local hardware store and browse the selection of deck stains. Consider factors like wood type, desired colour (natural, semi-transparent, or solid), and durability.
  • Test First:
Always test the stain on a small, inconspicuous area of the deck to ensure you like the colour and how it interacts with the wood.
  • Stain Application:
Apply the stain in long, even strokes with a brush or roller designed for deck stain. Work in sections, following the grain of the wood. Keep a "wet edge" as you go to avoid lap marks.
  • Reaching Every Nook:
Use a paintbrush to get into tight corners and railings.
  • Should I apply one or two coats?
Follow the manufacturer's instructions for the number of coats recommended. Typically, one coat is sufficient, but some stains require two for optimal coverage.
  • Let it dry.
Allow ample drying time between coats, as specified by the stain manufacturer.

Pro Tips for a Flawless Finish:
  • Work in sections:
Don't try to tackle the entire deck at once. Stain in manageable sections to ensure even application and prevent the stain from drying prematurely.

  • Favourable Weather:
Choose a day with mild temperatures and low humidity for staining. Avoid direct sunlight, as it can cause the stain to dry too quickly.

  • Clean Up:
Clean your brushes and rollers promptly with paint thinner or a product recommended by the stain manufacturer.

  • Seal the deal:
For extra protection and a longer-lasting finish, consider applying a deck sealer after the stain has completely cured.

Before


After 

Regrds,

Joseph Botelho

We appreciate you visiting our site and your comments on our subjects. Subscribe to our blog to get a copy of "Repair Smart: Money-Saving Maintenance Hacks for Homeowners." This ebook offers practical advice on how to control expenses for your do-it-yourself house renovations. Simply leave a comment to request a free copy of our ebook.

Request a complimentary copy of this ebook.


Monday, June 24, 2024

What You Need to Know About Building a Step Planter to Hold Your Plants

June 24, 2024

In this article, I will show you how simple and enjoyable it is to make awesome-looking planters to display around your home, such as on your deck or in front of the house. When a plant is placed on a planter stand, water can flow from the plant being displayed. Adding protection to your plants, herbs, and vegetables will keep them from drowning in excess water. 

Let's get started with this DIY project. 


Step One:
How large you cut your piece for your project will depend on the size of your planter. Any size you need can be cut to suit your planter. Prior to making any mitre saw cuts, I like to paint or stain my wood.

Step Two:
The two front legs should be cut first, followed by the back legs, which should be longer than the front legs. The sizes of both legs will vary based on the size of the planters you wish to display. For instance, my back legs will be 16" or longer, depending on how you want them to look, if my front legs are 8".

These are the finished steps for your step planter


Step Three:
I'll attach the front and back legs with my brad nailer, making sure to leave cross cuts for the planter to rest on. I start with the front legs and work my way back. If you examine the images I've included, go over picture number two to see more specifics about the intended appearance.

This is the first step for your planter


Step four:
Attach your cross piece to the front legs by nailing it there with your brad nailer or by hand. Next, attach the piece that will support your planter to the back legs by doing the same. Examine image number four for further information and an idea of how it should initially appear.

As you can see, we are now going to connect the first step to the second step


Step five:
Here, you will cut a long piece from the front to the back in order to attach the front step to the back step. Cut two identically sized long pieces, being sure to make a 45-degree cut at each end for a refined appearance. Then, with 45-degree cuts at each end, you will cut two pieces to fit between the two long cuts.

You have attached the bottom step to the top step


Step Five:
To make your planter look amazing, repeat step five on the top planter. Cut two identical pieces for each side of the planter, making sure to cut each end at a 45-degree angle to ensure a proper fit.

I have placed the trim around the first step


Side view of how it is going to look


Step six:
You have completed your project; now it is time to display your planters on the step planter you have just created. You can make it three steps by repeating each step for each planter. Hope you have enjoyed this tip on how to make a step planter.

This is the finished look


MaterialsI used:

1"x2"x8" spruce wood or any type of wood you like.
Brad Nailer
Hammer
Stain or paint
Mitre saw for nice clean cuts
Paint brush

If you have any questions or feedback, feel free to leave a comment.

Regards,


We appreciate you visiting our site and your comments on our subjects. Subscribe to our blog to get a copy of "Repair Smart: Money-Saving Maintenance Hacks for Homeowners." This ebook offers practical advice on how to control expenses for your do-it-yourself house renovations. Simply leave a comment to request a free copy of our ebook.

Request a complimentary copy of this ebook.


Full-Scope Painting and Handyman Services:

"The Secret to Saving on Home Improvements: It's in Your Appliances"

December 28, 2024 Making sure your appliances are functioning properly is a crucial part of a multifaceted approach to cost-cutting home upg...